How to Print Name Tags from Excel
If you need to print name tags from Excel, there are three common ways to do it. You can use Word mail merge, start from an Excel or Avery-style name tag template, or use a spreadsheet-to-PDF workflow designed for badges. All three methods can work, but they solve slightly different problems.
That is why this topic can feel more confusing than it should. Some people are trying to print a quick set of desk labels or simple attendee stickers. Others need branded conference badges with company names, roles, QR codes, and last-minute edits. Those jobs may all begin with the same Excel spreadsheet, but they do not always need the same output or the same software.
In this guide, we will compare the three main approaches and explain what each one is actually good for. We will also contrast the classic Microsoft Word process with template-based printing and print-ready PDF workflows, so you can choose the route that fits your event, your printer, and your deadline.
Many attendee lists start as an export from an event ticketing platform, not a blank workbook. Export formats and built-in badge options differ by vendor, so we keep dedicated guides for Eventbrite name badges, Cvent name badges, Bizzabo name badges, and Universe name badges.
If your goal is a fast event-badge workflow rather than a general Office workflow, you may also want to read Mail Merge vs Online Badge Generator, Name Badges from Excel, and Avery-compatible name badge templates for events (BadgeFlow supports Avery-compatible layouts when you are printing on common label and badge sheets).
Why people search “print name tags from Excel”
When someone searches for how to print name tags from Excel spreadsheet, they usually mean one of these things:
- “I have a list of names in Excel and want Word to place them into labels automatically.”
- “I bought pre-cut badge sheets and need a matching template.”
- “I have attendee data and need proper event badges in a print-ready PDF.”
Those are not the same workflow. The first is a document-merge task. The second is a stock-template task. The third is a badge-production task. Once you separate them, the decision becomes much easier.
Option A: Word + Mail Merge (what it’s good for)
The most traditional answer to mail merge name tags is Microsoft Word. In this workflow, Excel acts as your data source and Word acts as the layout and printing tool. You prepare a spreadsheet with clean column headers, connect it to Word, choose a label format, insert merge fields, preview the result, and then print.
This method is popular because many teams already have Microsoft Office and do not need to learn a new tool. If your name tags are simple and your print setup is predictable, mail merge can absolutely do the job.
Word mail merge is best for:
- simple internal events, schools, offices, and classrooms,
- standard label sheets with known dimensions,
- basic text-heavy tags,
- users already comfortable with Word and Excel,
- small to medium print runs where setup time is acceptable.
The typical process looks like this:
- Prepare your Excel sheet with one row per person and clear column names such as Name, Company, Role, or Table.
- Open Word and start a labels mail merge.
- Select the label vendor and product number, or create a custom label if needed.
- Connect your Excel file as the data source.
- Insert merge fields into the first label.
- Copy the layout to the rest of the sheet.
- Preview the results and print a test page.
This is a solid workflow for classic labels. It is especially useful when you want the output to live inside the Microsoft Office ecosystem from start to finish.
Where it gets harder is when the “name tag” is really an event badge. Conference badges usually have stronger visual hierarchy than labels. You may need a large first name, a smaller surname, a company line, an attendee role, a logo, a coloured strip for category, and maybe a QR code or barcode. That is all possible in Word, but it is not always comfortable. For layout ideas before you merge, see how to design conference name badges.
The main drawback is that Word is not badge-first. It is document-first. That means you often end up managing layout details manually. Small changes to margins, paragraph spacing, printer settings, or label definitions can affect alignment. Long names can wrap badly. You may find yourself repeatedly adjusting text and rechecking previews.
Mail merge also becomes slower when last-minute changes arrive. If one attendee changes company name, title, or spelling, you may need to reopen the document, verify the data link, check the layout again, and reprint. That is fine for occasional edits, but less pleasant under event pressure.
Choose Word mail merge if: you want a familiar Microsoft workflow, your tags are mostly text, and you are printing onto standard label stock.
Do not choose it first if: you need a polished branded badge design, custom sizing, or frequent last-minute reprints.
Option B: Template-based printing (Avery-style workflows)
The second common route is an excel name tag template workflow. Instead of building the layout yourself, you start from a known template that already matches a specific product or sheet format. This is the classic Avery-style approach.
Template-based printing is popular because it removes one of the biggest sources of frustration: dimensions. Rather than creating a custom grid and hoping it matches the physical stock, you begin with a template designed for that exact sheet or badge format.
This option is best for:
- teams using pre-cut badge or label sheets,
- repeatable office or event workflows with the same stock each time,
- people who prefer a visual template to setting up dimensions manually,
- printing jobs where the badge design is still fairly simple.
In practice, template workflows often feel easier than raw mail merge. You choose the product code or template, add your design, connect or paste your data, and print. Because the shape and spacing are already defined, there is less setup compared with creating a custom layout from scratch.
That makes template-based printing a good middle ground. It is usually more visual than plain Word mail merge, but still familiar and straightforward.
BadgeFlow and Avery-style stock: If you already use Avery or Avery-compatible sheets, BadgeFlow supports Avery-compatible templates so you can align badge art to those product grids without rebuilding everything from scratch. For a deeper comparison of when sheet templates make sense for events, read Avery®-Compatible Name Badge templates for events.
However, the trade-off is rigidity. A template is tied to a specific stock format. If you change badge size, switch vendor, use a different printer, or need a custom insert size, the template may stop being helpful. You can end up hunting for the right product number or adapting a design that was never meant for your print setup.
This is also where many people discover the difference between template printing and badge design. A template helps you line up output on a known sheet. It does not automatically make the badge visually effective. If your event badge needs hierarchy, branding, logos, category colours, dynamic fields, or scannable codes, a sheet template can still feel limiting.
Another issue is portability. A design built around one particular sheet stock does not always transfer well to another format. If your team later decides to print on inserts, cut plain paper, or use a different badge holder, you may need to rework the whole layout.
Choose a template-based workflow if: you already have compatible pre-cut sheets and want the fastest route to filling a known format.
Do not choose it first if: you need flexibility across different badge sizes, custom paper formats, or more advanced event badge design.
Option C: Spreadsheet → print-ready PDF workflow (event badge oriented)
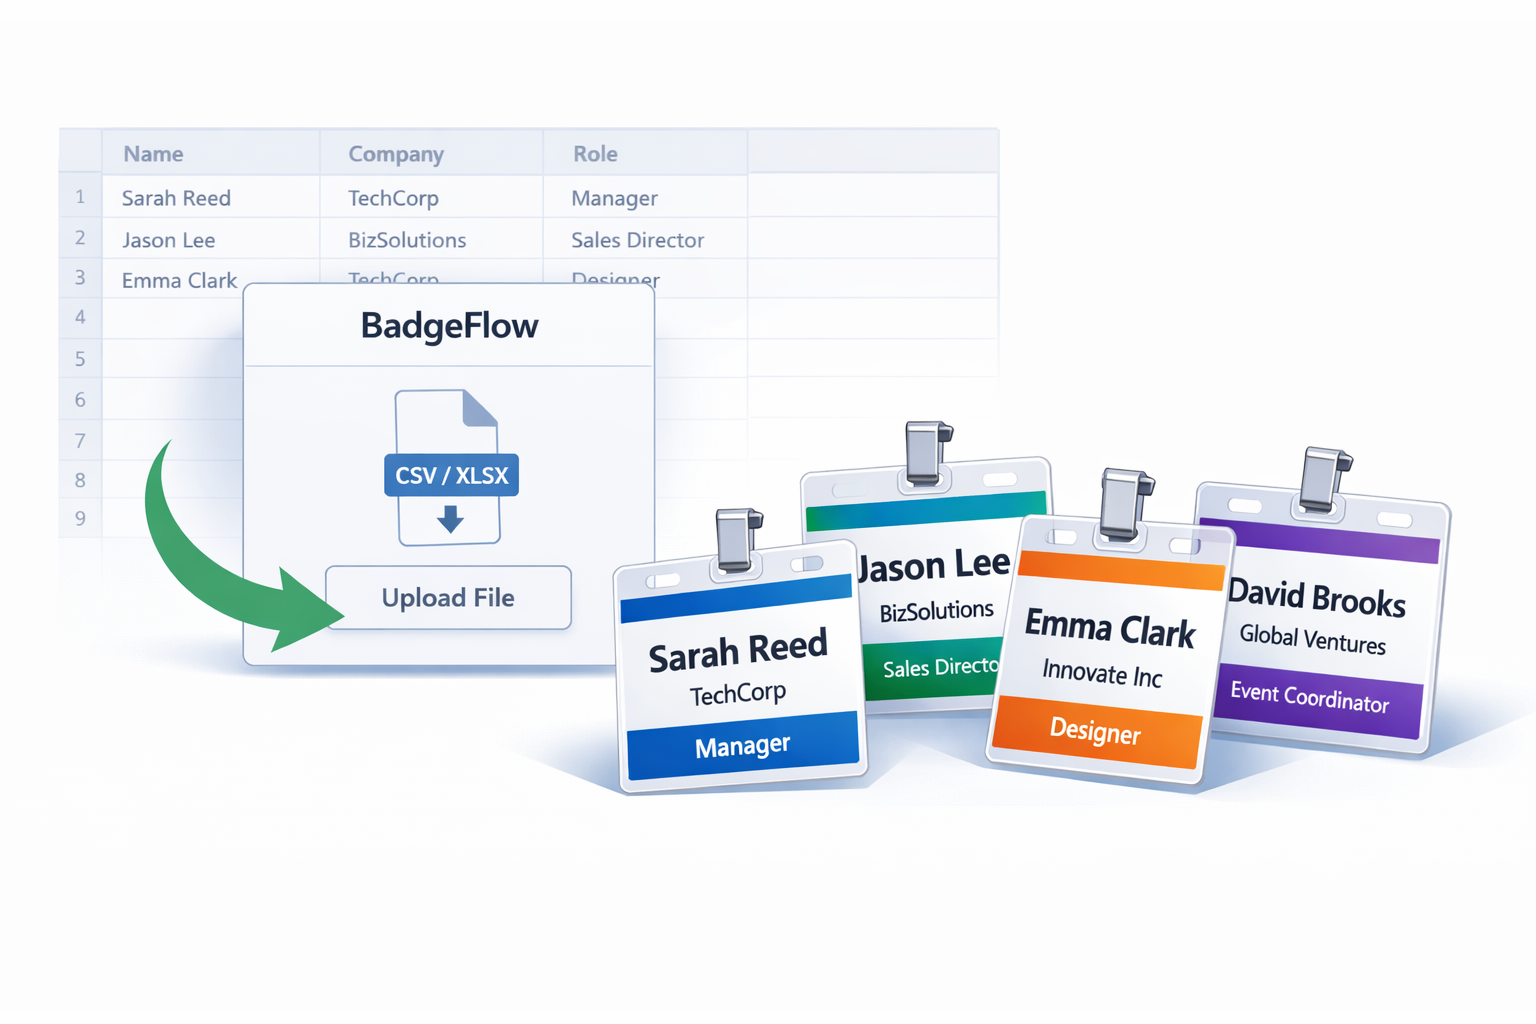
The third option is the one many event teams actually need, even if they do not search for it by name. Instead of treating Excel as a data source for Word or for a sheet template, you treat Excel as the source of badge data and generate a print-ready PDF from it.
This is a different mindset. The goal is not simply to merge names into a document. The goal is to produce finished badges that are ready to print, cut, and hand out.
For event use, this can be the most practical route because badges are not ordinary labels. They are part of registration, branding, networking, access control, and attendee experience. A good badge needs to be readable, attractive, and easy to print consistently.
A spreadsheet-to-PDF workflow is best for:
- conferences, meetups, workshops, training sessions, and school events,
- badges with logos, roles, attendee types, and branded styling,
- dynamic QR codes or barcodes,
- custom or non-standard badge sizes,
- teams that need quick last-minute edits and reprints,
- print setups that are not tied to one exact label sheet product.
In this workflow, your spreadsheet becomes structured badge data. One row equals one attendee. Columns become fields such as first name, surname, company, role, team, country, category, or code. You map those fields to a badge design, preview the result, and export a print-ready PDF.
That approach can be more natural for real badge production. You are working directly with the output you care about instead of forcing the job through a document-first or sheet-first layout.
It is also easier to maintain visual hierarchy. For example, you can make first names large, reduce company text slightly, keep roles in a coloured band, and leave room for a QR code without squeezing everything into a Word table cell. When a speaker name is long or a company title changes, a badge-oriented workflow is generally easier to adapt.
That is one reason BadgeFlow’s own Excel-based workflow is badge-first. The product is positioned around taking spreadsheet data, mapping fields, choosing a badge layout, and exporting a print-ready PDF for standard or custom badge sizes. If your goal is event badges rather than office labels, that workflow is usually closer to the actual job you need to complete.
It also handles scale better. If you have 20, 200, or 2,000 attendees, the process stays conceptually the same: clean the data, map the columns, check the preview, export the PDF, and print. You are not constantly worrying about label grid definitions or whether the document layout will shift when the data changes.
Choose a PDF-first workflow if: you care about badge design, flexibility, clean print output, and easier event-day changes.
Do not choose it only if: your job is a very simple office-label task and you already have a working Word or sheet-template setup.
Which option is fastest?
If everything is already set up, a known template can be very fast. If your whole team lives inside Microsoft Office, Word mail merge may feel fastest because it uses tools you already know. But for event badges specifically, a print-ready PDF workflow can be the quickest overall because it removes the extra friction of document formatting and stock-specific label setup.
That is the key distinction. Speed is not just about clicking fewer buttons. It is about how many things can go wrong before you get to the printer.
- Word mail merge is fast if the layout is simple and the stock is standard.
- Template-based printing is fast if you already have the right badge sheets and template.
- Spreadsheet → PDF is often fastest for event badges because it focuses directly on the final printable badge.
How to choose the right workflow
Use this simple rule:
- Use Word mail merge for document-style label printing.
- Use templates for known pre-cut stock.
- Use spreadsheet-to-PDF for actual event badge production.
If you are organising a conference, workshop, networking event, or school programme, the third route can be the most future-proof. It gives you more control over design, supports custom badge sizes more easily, and usually makes last-minute changes less painful. If budget is tight, printing event badges on a budget walks through trade-offs that still keep badges readable and on-brand.
Troubleshooting: misalignment, long names, scaling, and last-minute edits
Misalignment
Misalignment is one of the most common problems when trying to print name tags from Excel. The cause is rarely Excel itself. It is usually a mismatch between your file and your paper stock, or between your file and your printer settings.
Common causes include:
- choosing the wrong label product number,
- using a template that does not match the physical sheet,
- printing with scaling or “fit to page” enabled,
- incorrect paper size in the print dialog,
- printer margin behaviour that differs from the file setup.
What to do: always print a test page first, confirm the correct stock format, and make sure you are printing at actual size rather than scaling the output. If you are unsure which physical format to standardise on, start with conference badge size before locking a template.
Long names
Long names expose the limits of simple label layouts. If your design assumes every attendee has a short first name and surname, the layout can fall apart quickly when someone has a long full name or a long company line.
What to do: decide in advance how text should behave. You might wrap names across two lines, reduce the font slightly, separate first and last names visually, or shorten secondary fields such as company or role. Badge-oriented PDF workflows usually make these design decisions easier to manage than Word tables or rigid sheet templates.
Scaling problems
Scaling issues often happen at the very end. The design itself may be correct, but the print dialog changes the dimensions. A tiny amount of scaling can be enough to ruin sheet alignment.
What to do: check for settings such as “fit,” “shrink oversized pages,” or browser-based PDF scaling. Print at 100% or actual size whenever your workflow depends on precise physical dimensions.
Last-minute edits
Real events change at the last minute. Someone updates their job title. A speaker is added. A VIP’s surname is misspelled. One person needs a replacement badge five minutes before registration opens.
What to do: keep one clean master spreadsheet and use a workflow that makes reprints easy. If reprinting a single corrected badge means reopening a complex Word merge or rebuilding a template page, your process may be too fragile for live event use.
Final takeaway
If you searched for print name tags from Excel, the real question is not just how to get data out of Excel. The real question is what kind of printed output you need.
If you need simple office-style labels, Word mail merge is still a valid and useful choice. If you already have pre-cut badge stock, a template-based workflow may be the easiest path. But if you need polished event badges with better design control and a cleaner route to printing, a spreadsheet-to-PDF workflow may be the better answer.
In short:
- Mail merge is for document-style label production.
- Templates are for known stock.
- Print-ready PDF workflows are for modern event badges.
If your badges need branding, dynamic fields, QR codes, flexible sizing, or quick reprints, that third option is usually the one that saves the most time.