How to Print Name Badges from Eventbrite
If you're running an Eventbrite event and you need Eventbrite name badges today, you don't want to wrestle with Word mail merge or spend your morning resizing text boxes. The reliable workflow is:
- Export Eventbrite attendees to CSV or Excel
- Import the exported CSV or Excel file into BadgeFlow
- Generate a print-ready name badges PDF and hit Print
Running events on Bizzabo instead? Use our matching walkthrough for printing name badges from Bizzabo.
What you'll need
- Your Eventbrite event (with attendees already registered)
- A CSV or Excel export from Eventbrite (Attendees report or Orders report)
- BadgeFlow open in your browser: badgeflow.app
- Paper stock you plan to print on
Step 1 — Export your Eventbrite attendee list (CSV or Excel)
Eventbrite provides a couple of exports. For name badges, you'll usually want the Attendees report because it's closest to "one badge per person".
Option A (recommended): Export the Attendees report
- Open your event in Eventbrite.
- Export the attendees report as a CSV or Excel file.
Use Eventbrite's official manual for the exact UI path (it changes occasionally): Download an Attendees report (Eventbrite Help)
Option B: Export the Orders report (useful for billing / edge cases)
If your attendee data is tied to orders (e.g., you want the buyer name, invoice details, or multiple tickets per order), export the Orders report instead.
Official manual: Download an Orders report (Eventbrite Help)
Quick rule of thumb: Attendees vs Orders
- Choose Attendees if you want one badge per person (most events).
- Choose Orders if you need the buyer details or are reconciling ticket purchases.
If you also manage events in Cvent, follow our dedicated guide on how to print name badges from Cvent for platform-specific export steps.
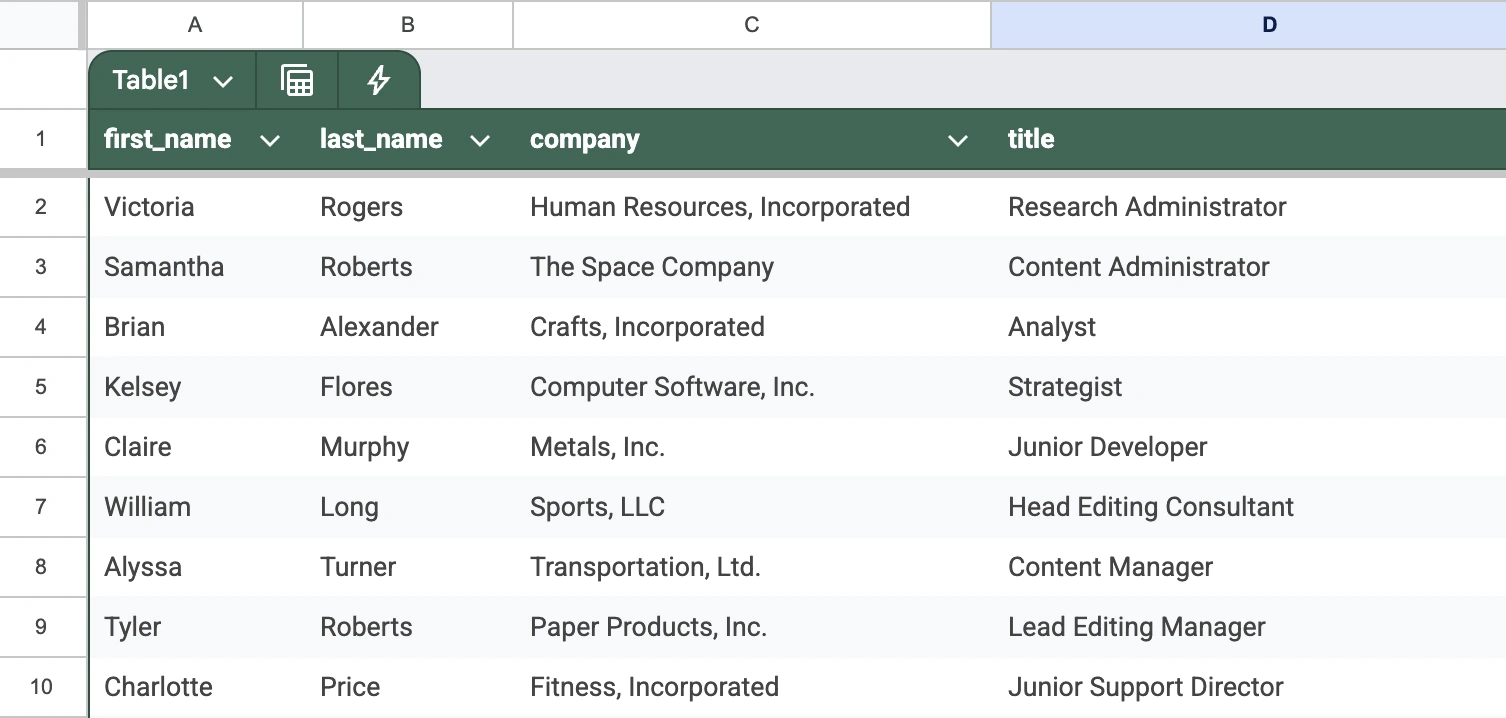
Step 2 — Clean up your CSV or Excel file (optional, but saves headaches)
You can often import the Eventbrite CSV or Excel file as-is. But a quick tidy helps avoid awkward badge fields (like printing "N/A").
Checklist
- Remove columns you won't use (less clutter when mapping fields).
- Check name fields:
- If you have First Name and Last Name, great.
- If you only have a single Name column, also fine (BadgeFlow can use it directly).
- If you collected custom questions (company, role, dietary, etc.), confirm those columns appear in the export.
- Standardise casing if you care (e.g., "alex" → "Alex").
If your attendee data lives in a spreadsheet rather than an Eventbrite export, our guide on name badges from Excel covers column preparation tips that apply here too.
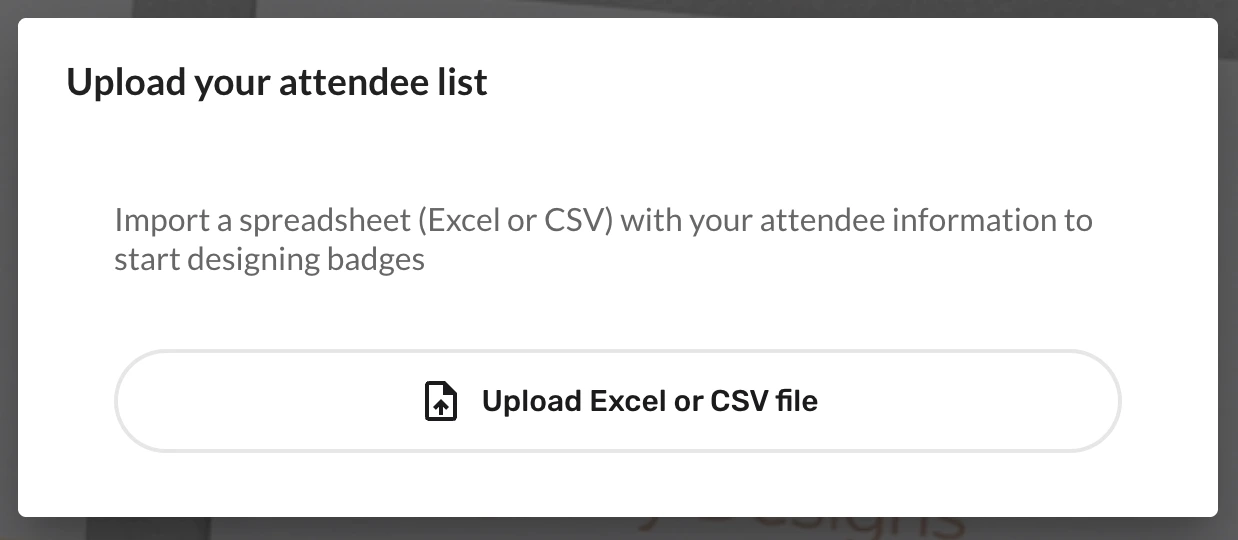
Step 3 — Import the Eventbrite CSV or Excel file into BadgeFlow
- Open BadgeFlow.
- Click Upload Excel or CSV file.
- Upload the file you exported from Eventbrite.
- Map CSV or Excel columns to badge fields (e.g., First Name, Last Name, Company, Role).
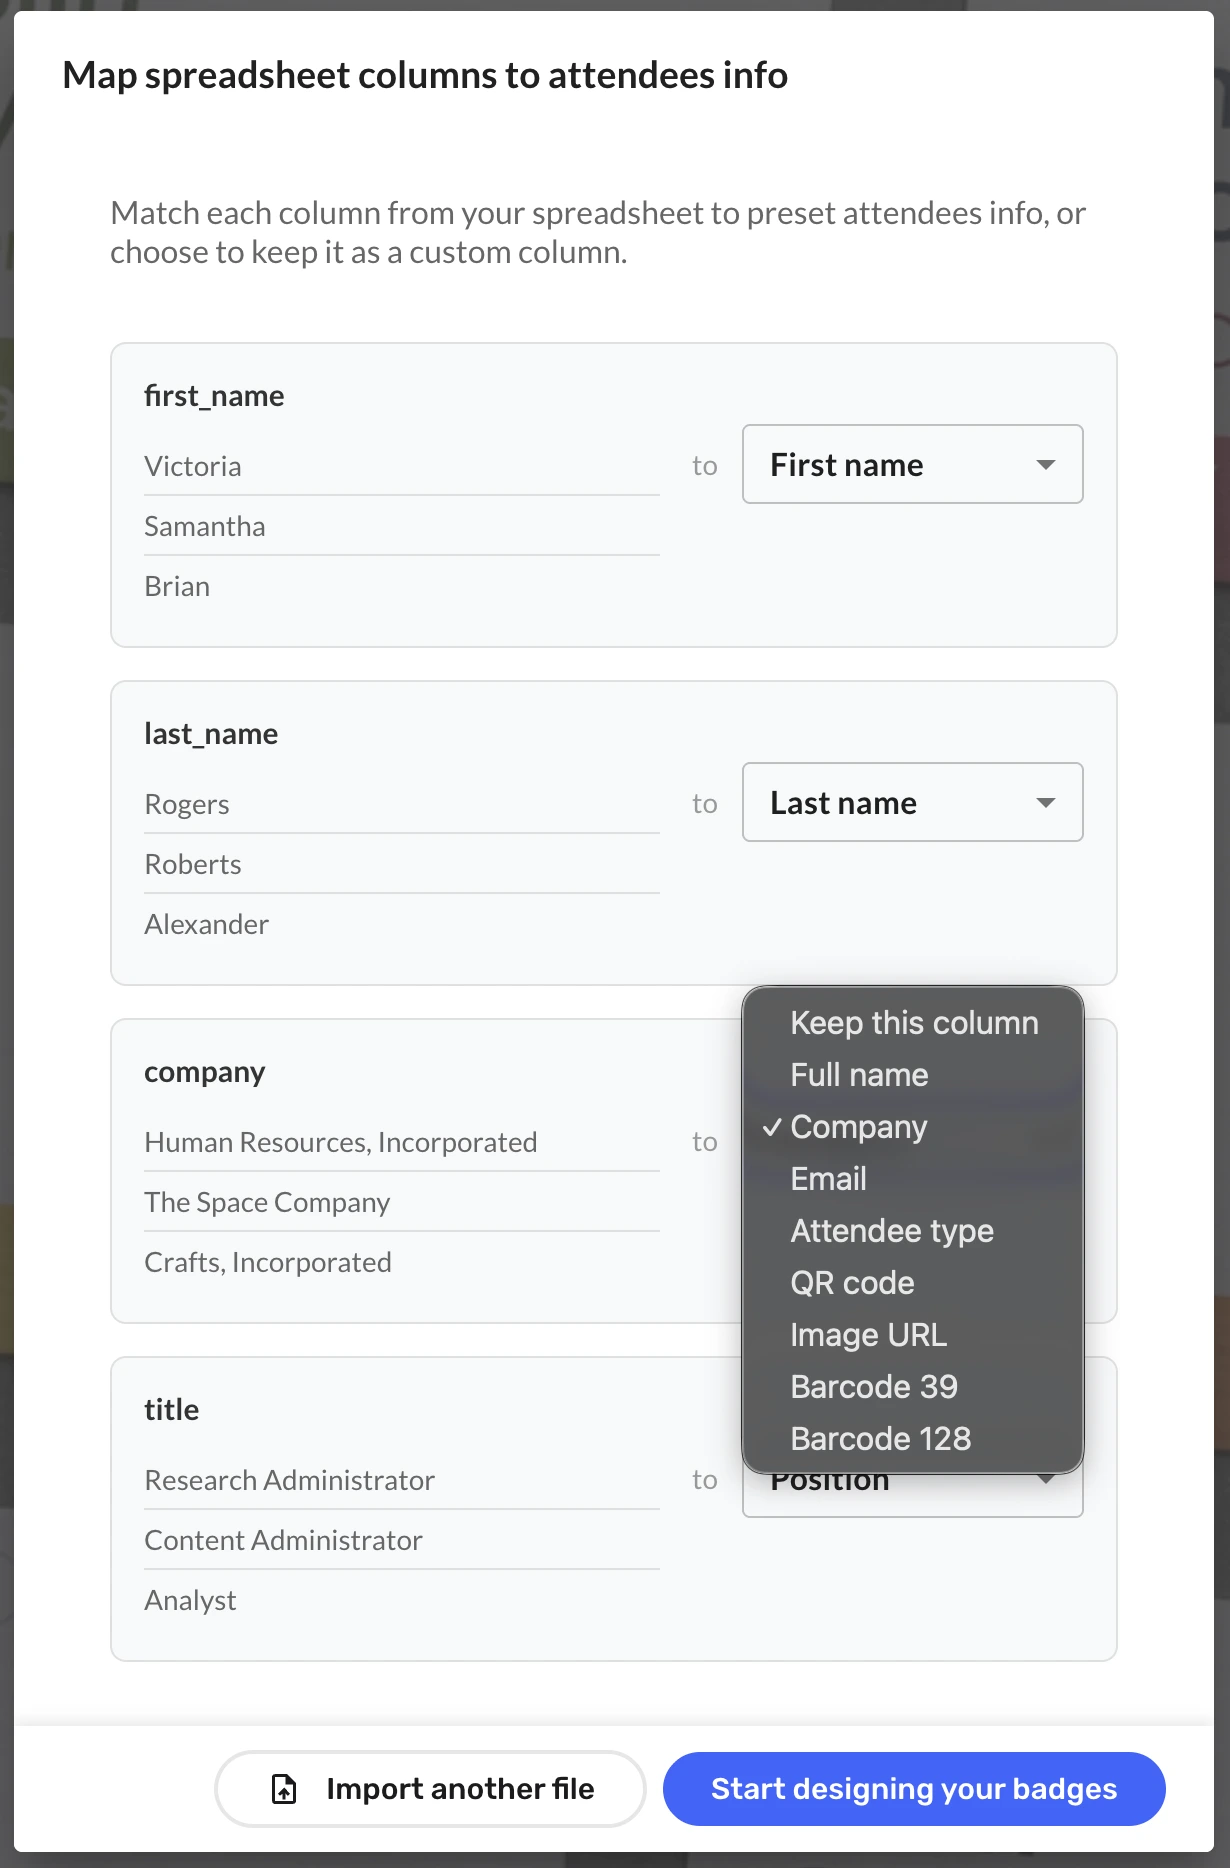
If you need scannable codes on your badges: QR code, Barcode 39 or Barcode 128
- Ensure your CSV or Excel export has a column with a unique value per attendee (e.g., ticket_id, attendee_id, order_id, or a custom “badge_code”).
- Map the column with the unique value to a QR code, Barcode 39 or Barcode 128 field.
Common Eventbrite columns you'll likely use on badges
- Name (or First Name + Last Name)
- Company (if collected as a custom question)
- Job title / Role (custom question)
- Ticket type (helpful for staff / VIP / speaker badges — see how to use colour-coded roles for company events)
- Email (optional; many organisers avoid printing it)
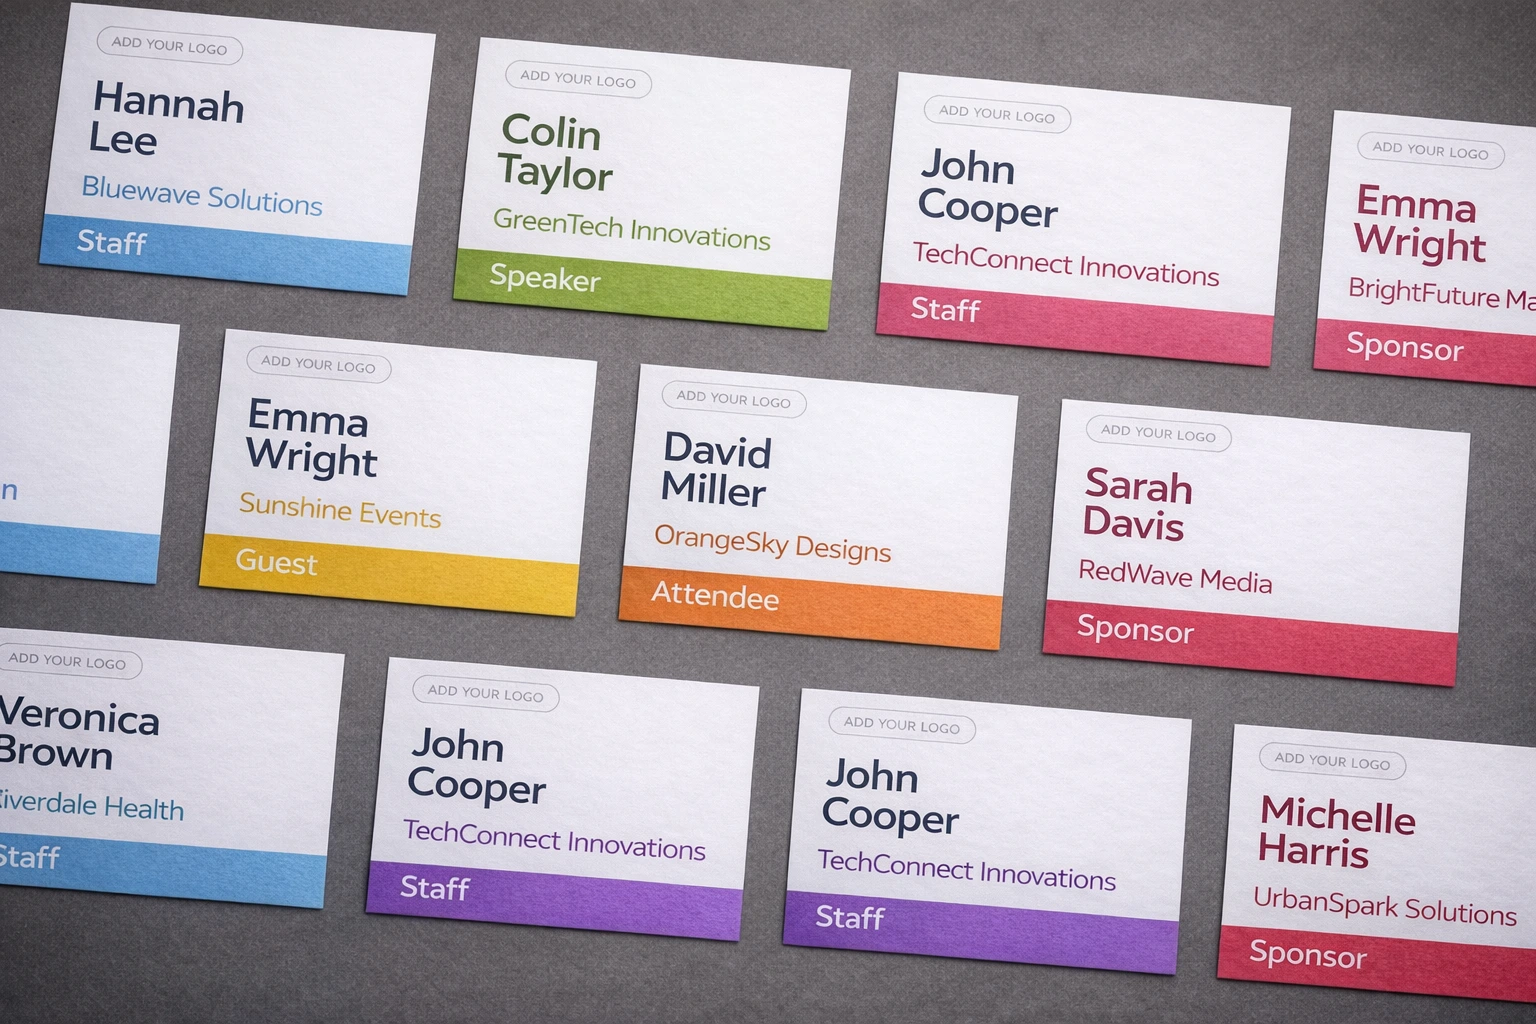
Step 4 — Pick a badge size and template
Now the fun bit: making it look professional without spending your entire life nudging text boxes.
- Select a badge size you need (standard options or custom dimensions).
- Select a badge template (30+ pre-designed professional templates to choose from).
![]()

Badge design tips (the ones that actually prevent chaos onsite)
- Optimise for readability from 1–2 metres. Big names, high contrast, don't get fancy with thin fonts.
- Make company smaller than name. People greet humans first.
- Keep the layout consistent. "Speaker" badges should look intentionally different (colour stripe works well).
- Test print one page. Always. Printers are liars until proven otherwise.
For a deeper look at fonts, sizing, colour strategy, and layout hierarchy, see how to design conference name badges.
Step 5 — Customise the template (branding + extra fields)
Templates are just a starting point. In BadgeFlow’s intuitive drag-and-drop editor, you can quickly make the badge look like your event.
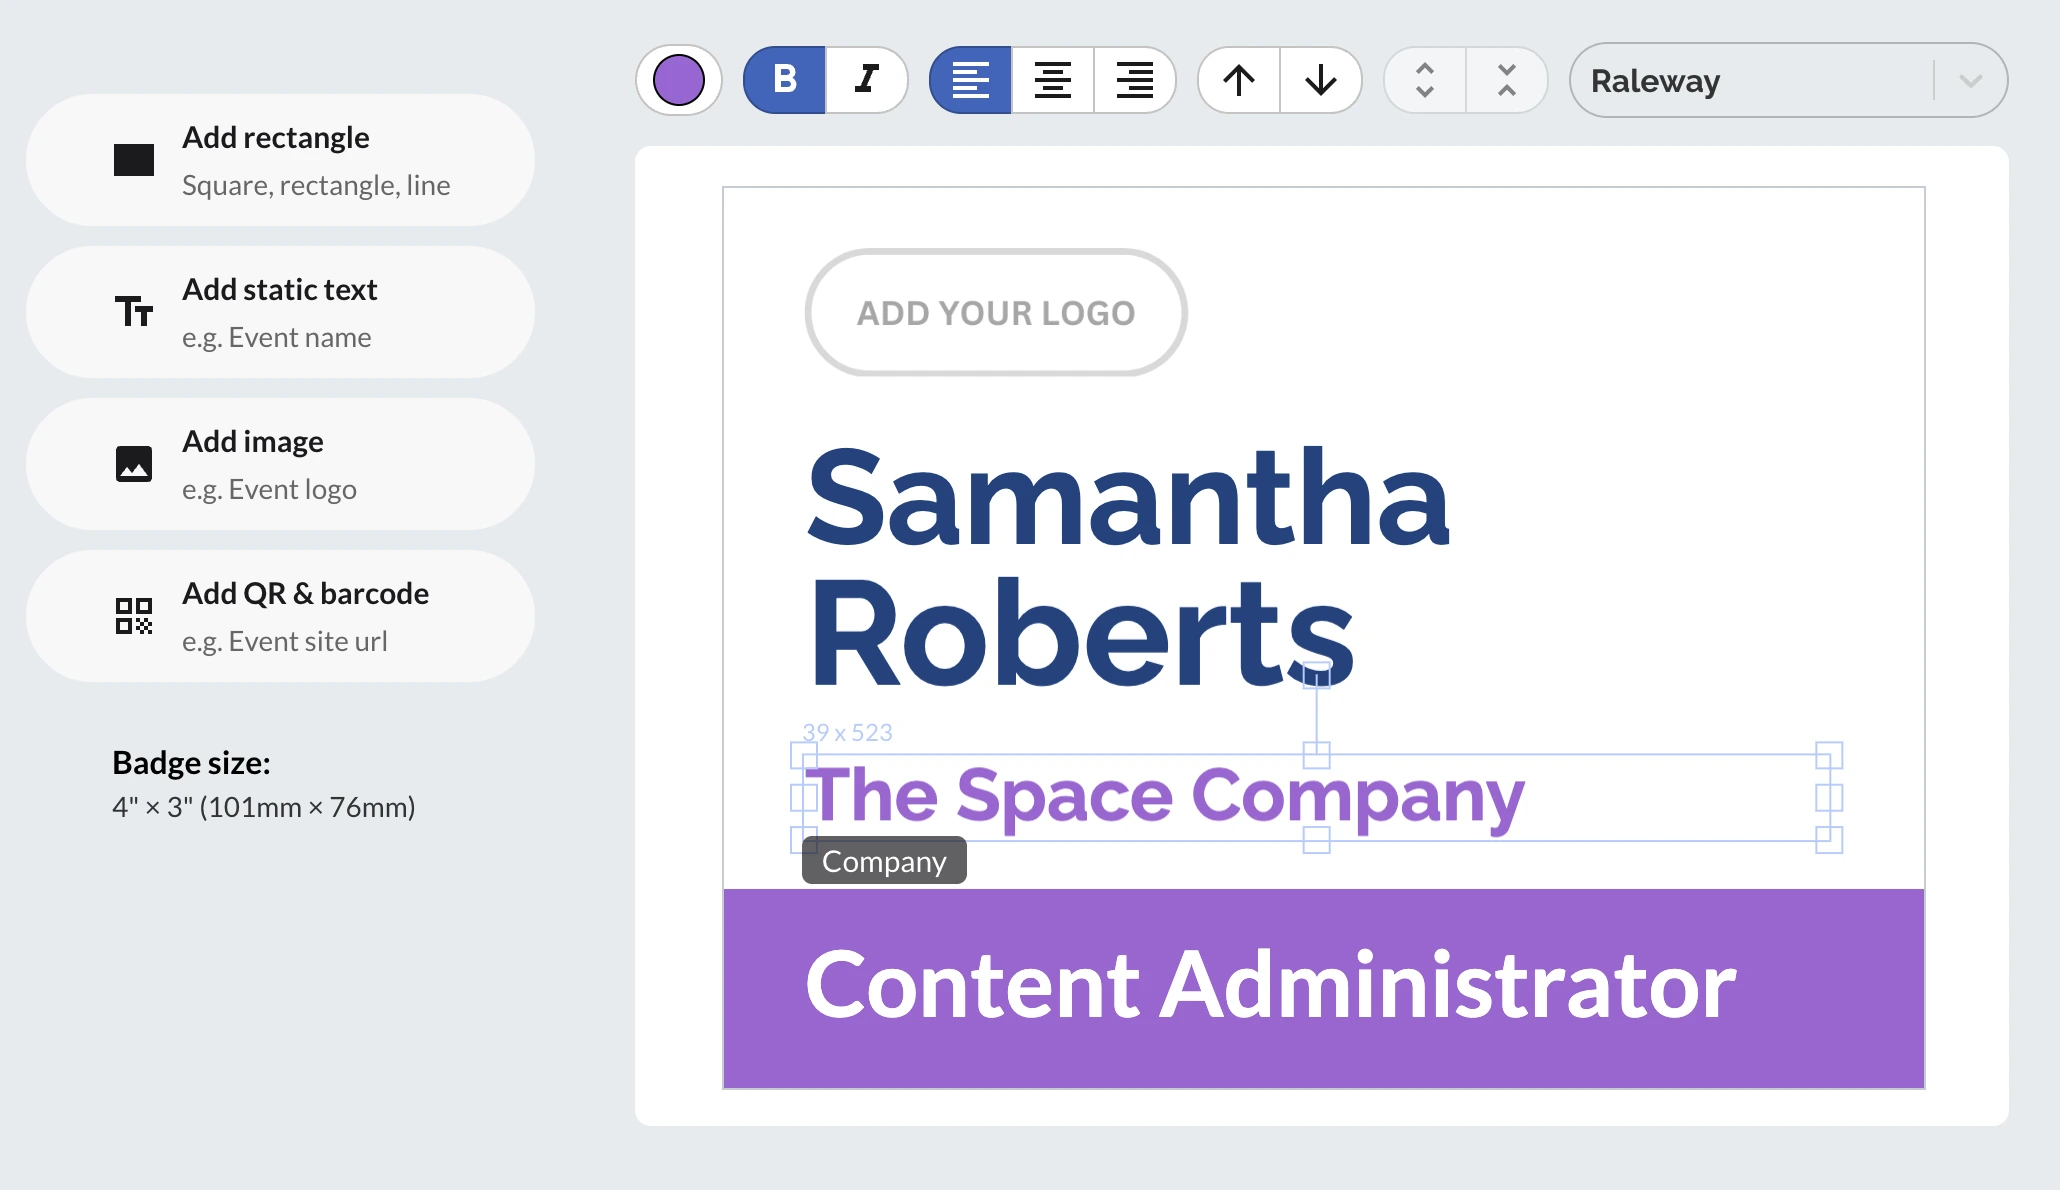
- Tweak styling: change colours, fonts, and spacing to match your branding.
- Add more dynamic fields: drop in extra columns from your CSV (company, role, ticket type,, etc.).
- Add static elements: logo, event name/date, labels like “STAFF” or “SPEAKER”, simple shapes/stripes.
- Add a static QR code: drop in a QR code that’s the same on every badge — perfect for linking to your code of conduct, Wi-Fi details, venue map, schedule, feedback form, or an “emergency info” page.
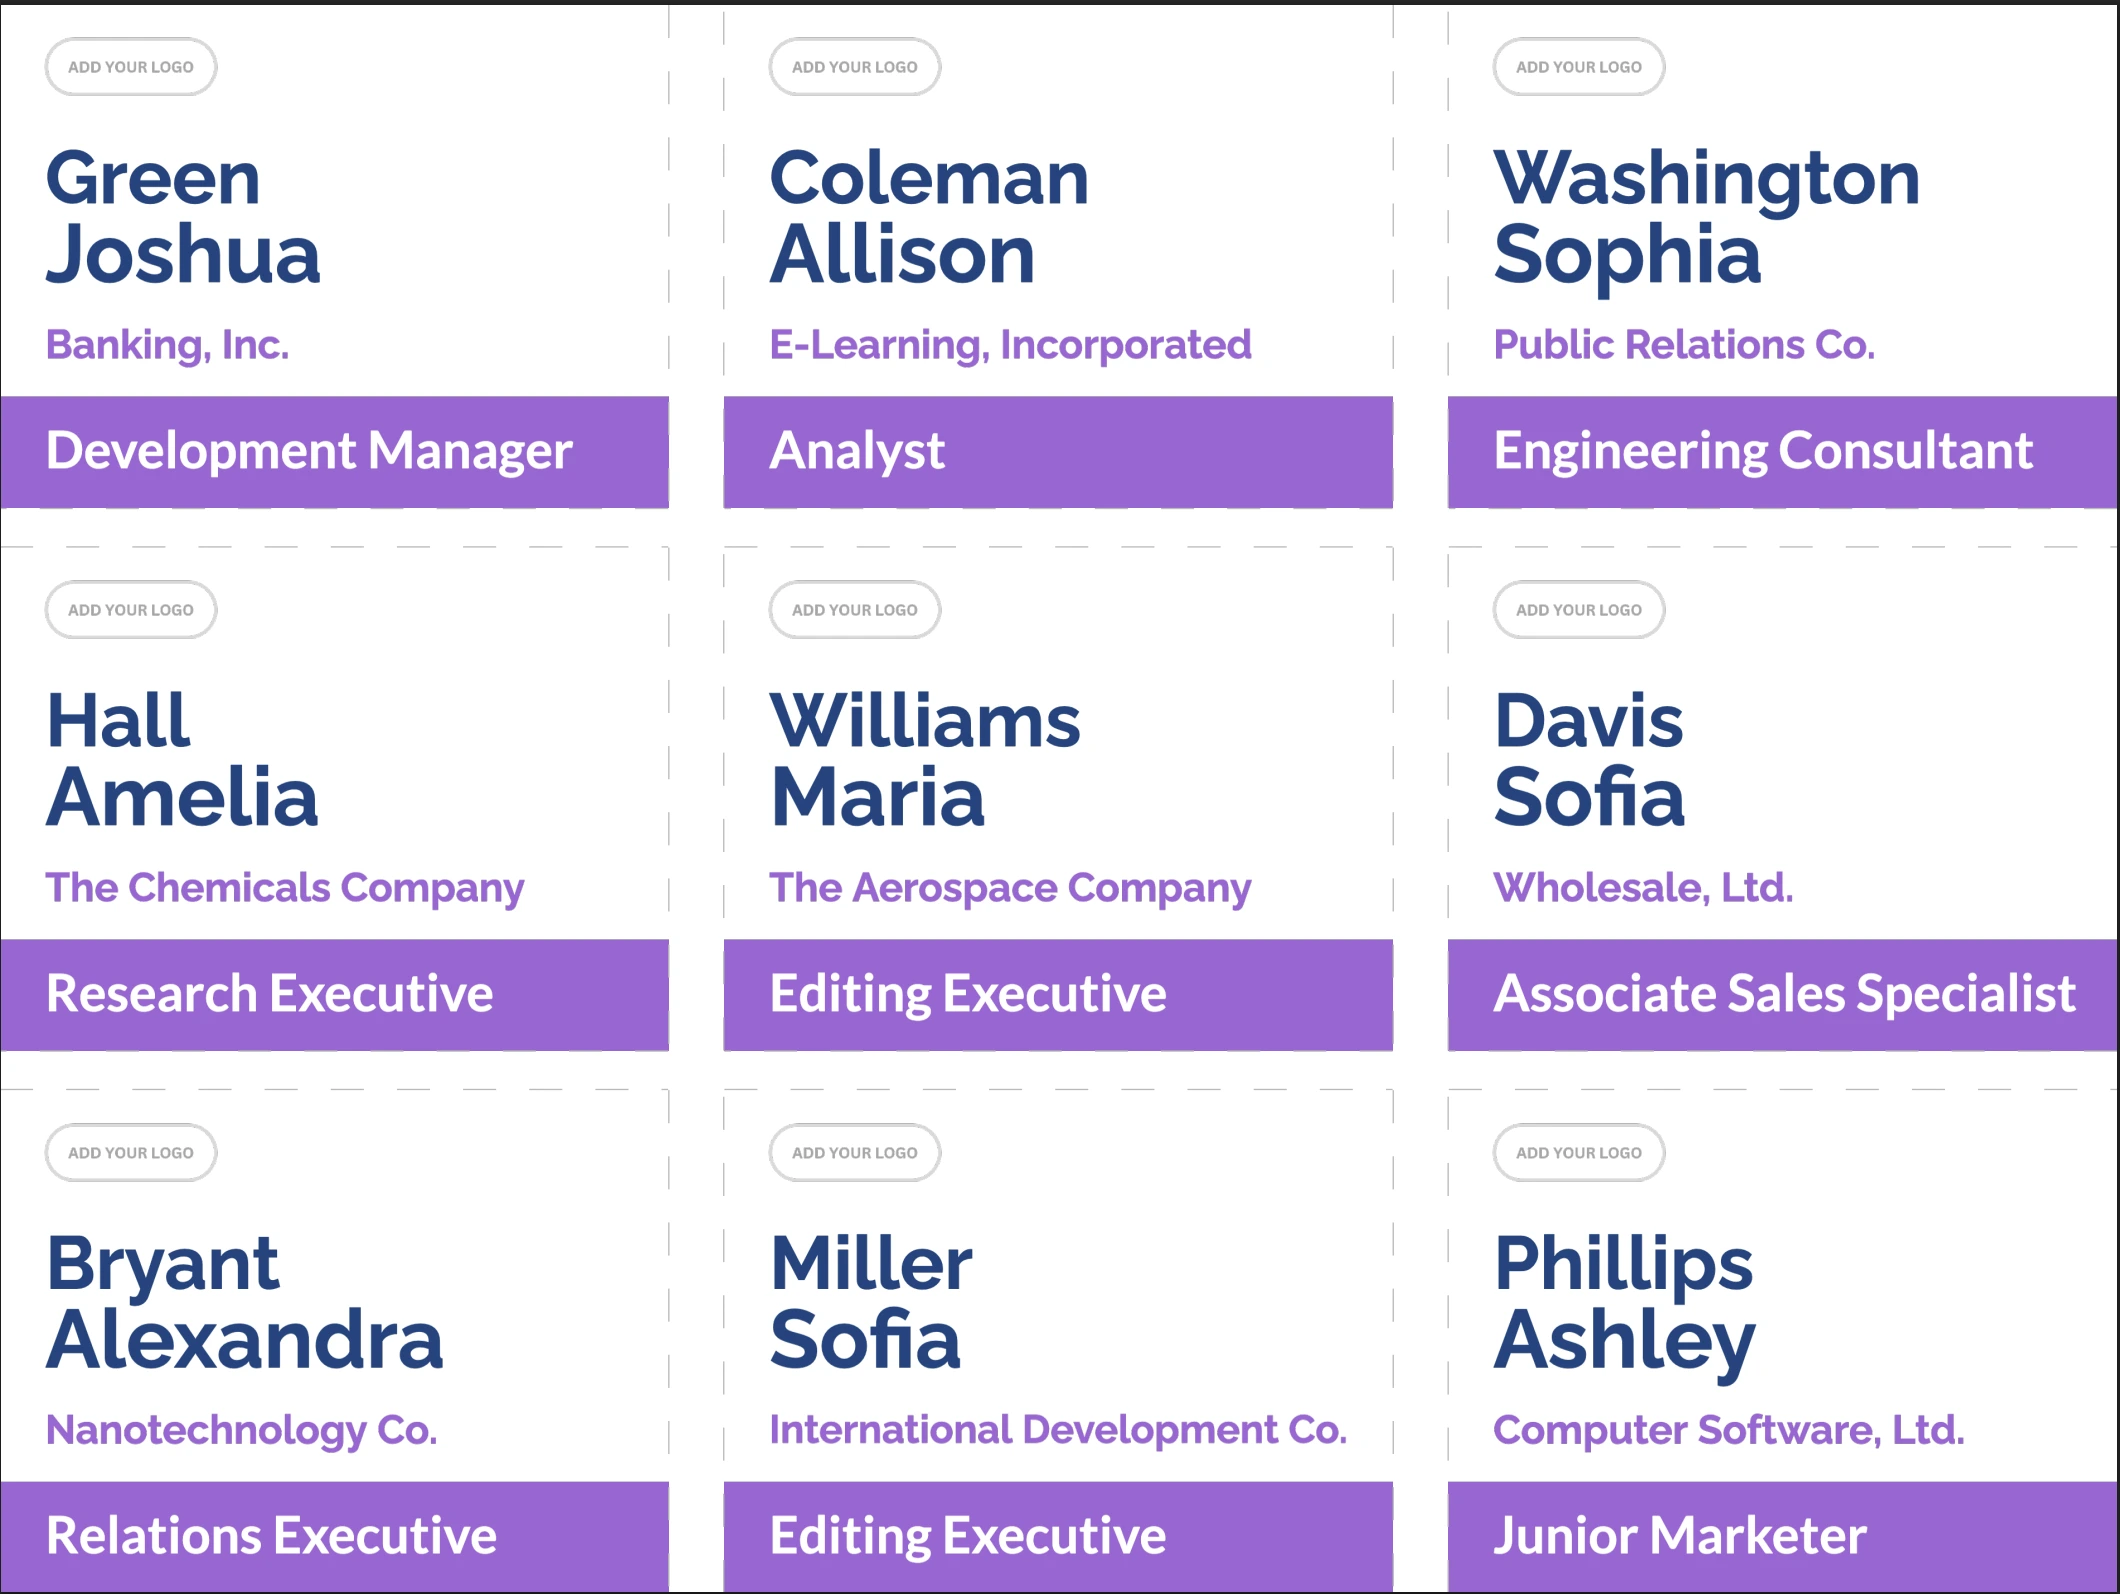
💡 Tip: Preview a few attendees (short names, long names, missing company) before exporting.
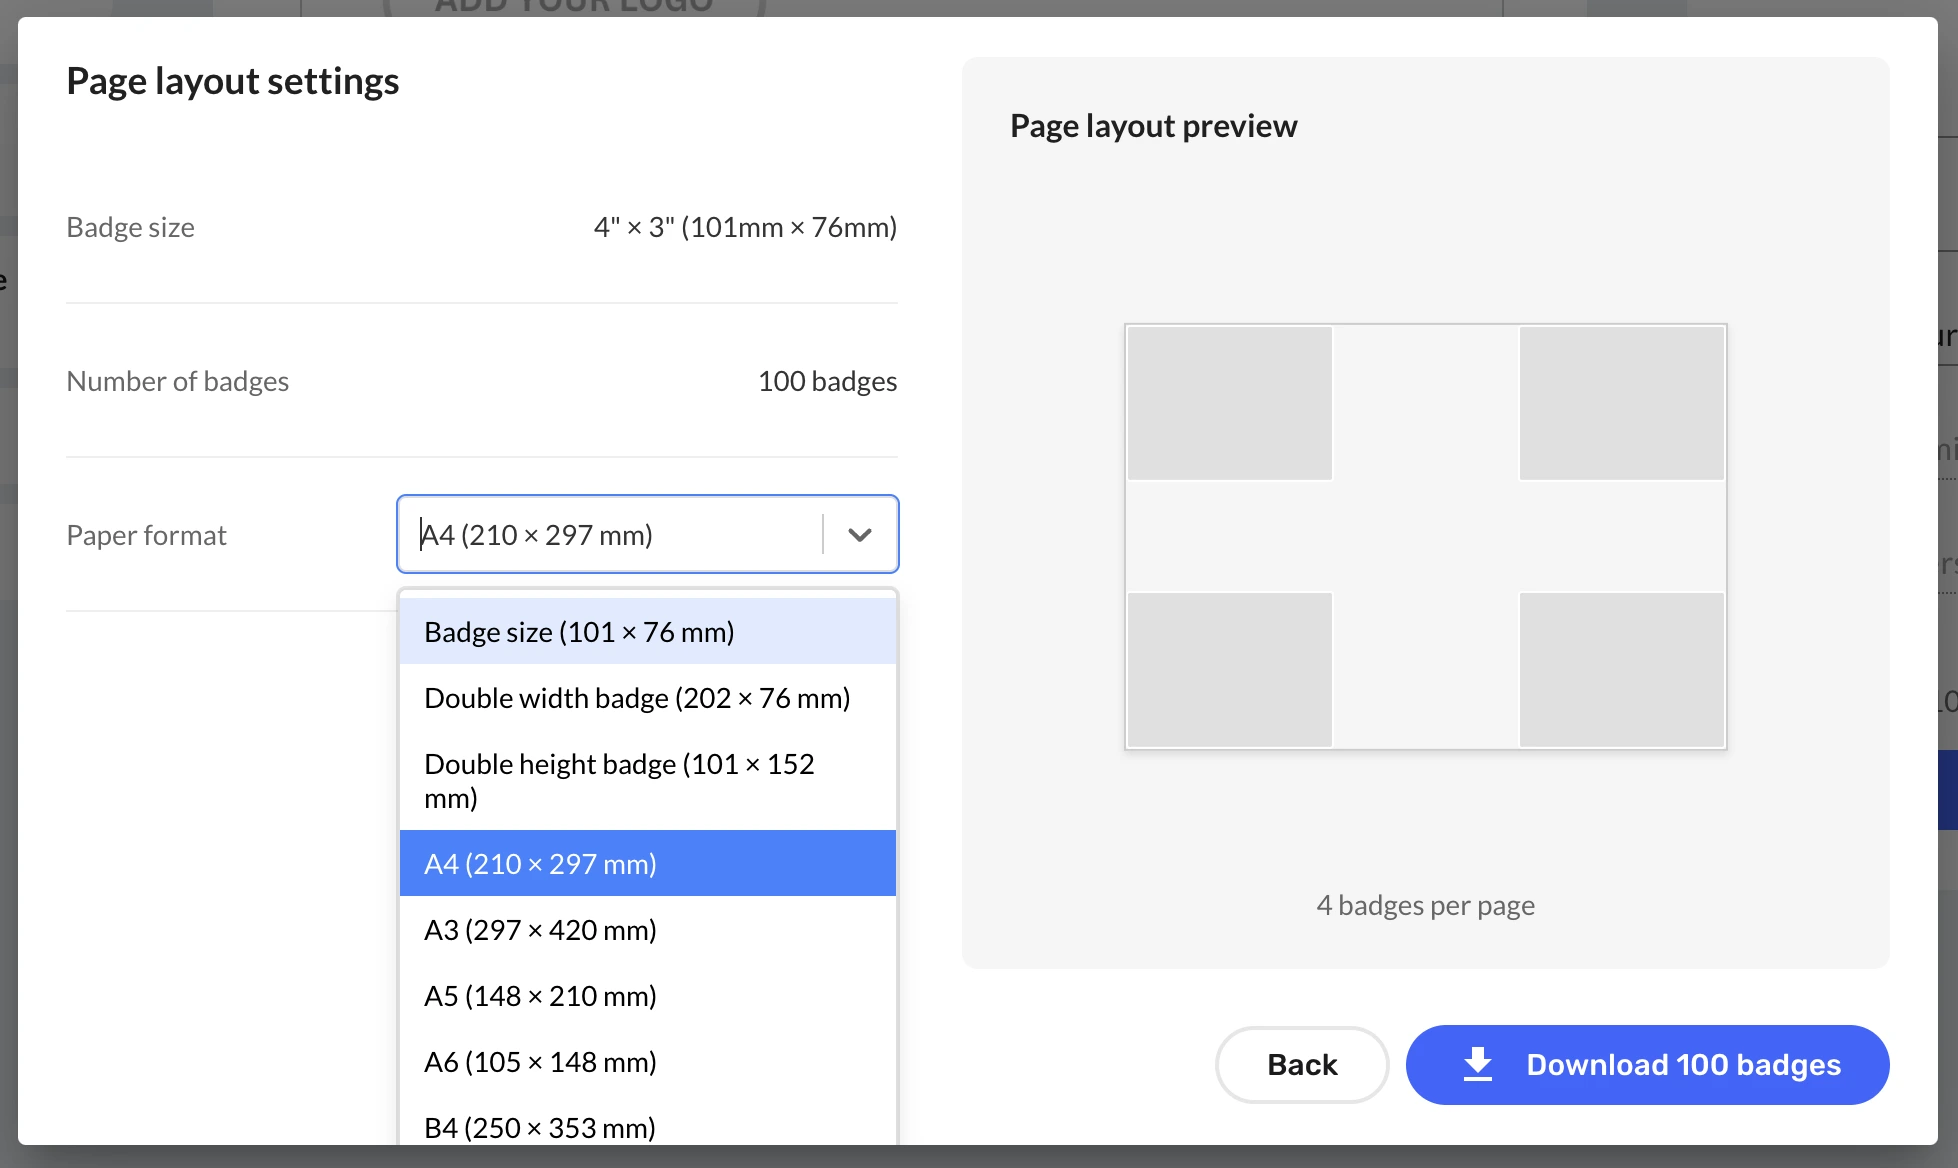
Step 6 — Select paper size
- Click Download badges in the bottom right corner of the screen.
- Select the correct paper size.
- Check the page layout preview to see how it will look.
BadgeFlow supports any paper size — A4, Letter, or custom dimensions. Match your export to the paper or badge stock you're actually using.
- Standard sheets (A4 / Letter): for printing on office paper.
- Badge stock size (for badge printers): if you're printing on a dedicated name badge printer, select the exact badge media size (the insert/stock your printer uses) — standard or custom. BadgeFlow supports any badge dimensions, so you can match your printer's stock precisely and avoid scaling or cropped edges.
Step 7 — Generate your print-ready PDF
Now just click Download badges one more time to generate your print-ready name badges PDF.
🖨️ Print without scaling
The #1 way to ruin badge alignment is letting your printer "help". When printing the PDF:
- Set scaling to Actual size or 100% (not "Fit").
- Confirm the paper size matches your PDF.
- If using badge sheets: print one test page on plain paper first, then hold it behind a badge sheet up to a light.
⚡️ Troubleshooting (fast fixes)
"My badges are misaligned on the sheet"
- Check print scaling is 100%.
- Confirm the paper size is correct in both BadgeFlow export and printer settings.
- Do a single test page before printing the whole stack.
"Some names are too long"
- Reduce the name font slightly.
- Consider splitting into First Name (big) + Last Name (slightly smaller) for extreme cases.
"My company / role column isn't in the export"
- Make sure you exported the right report (Attendees vs Orders).
- If it's a custom question field, confirm it's included in the export settings (Eventbrite UI varies by account/event type).
✅ Recommended workflow recap (the 90-second version)
- Export Attendees report CSV or Excel from Eventbrite.
- Import the exported CSV or Excel file into BadgeFlow.
- Map badge fields → pick a badge size and template → preview.
- Customise the template if needed (branding + extra fields).
- Export a print-ready PDF (any paper size you need) → print at 100%.
FAQ
Can I print Eventbrite name badges directly from Eventbrite?
Eventbrite can integrate with badge/on-site tools via its ecosystem, but some organisers prefer exporting attendees to CSV or Excel and using a dedicated badge generator for layout control and print-ready PDFs.
Which Eventbrite export should I use for badges: Attendees report or Orders report?
Attendees report is best for "one badge per person". Use Orders report if you need buyer/order details or you're troubleshooting ticket purchaser vs attendee info.
Does this work for onsite badge printing?
Yes. If you can export a fresh CSV or Excel (or maintain an updated attendee list), you can regenerate a new PDF quickly. For truly live, instant printing workflows, you'll want a dedicated onsite setup (printer, stock, and a process for last-minute edits). See how developer meetup organisers handle onsite badge printing for a practical example.
Can I include QR codes on badges (for check-in or lead scanning)?
Yes — if your attendee data includes a unique value (e.g., order ID, attendee ID, or a custom unique code), you can place it on the badge as a QR/barcode field.
What about paper size — A4, Letter, or custom? Does it matter?
Yes. A4 and Letter are close enough to look "fine" until they're very much not — and if you're using badge stock or a dedicated badge printer, the exact dimensions matter even more. BadgeFlow supports any paper size. Match the PDF export and printer settings to the paper or badge stock you're actually using.